

Table of contents
Overview
Key steps
At the end of this tutorial, you will have completed the following steps of Dockerization:
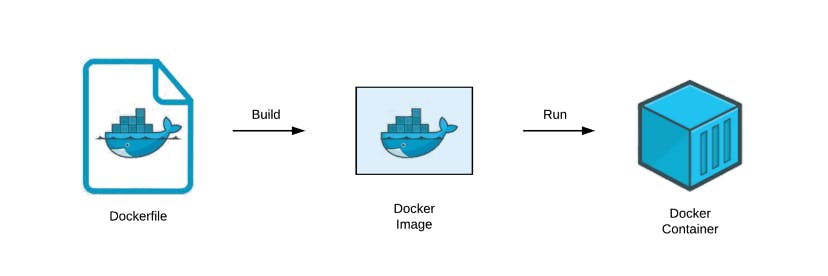
- Write a Dockerfile
- Build a Docker image
- Test the image by creating and running a Docker container
Checklist
There are very few things you will need to have to complete this tutorial, but you will NOT need to pay any extra fees:
- A computer with:
- any OS
- an internet connection
- a modern browser installed
- Git, Python, and pip installed and added to your system environment
- Your Django project's source code on that same computer
- A Github account (signup for free at github.com/signup)
- A DockerHub account (signup for free at hub.docker.com/signup)
Writing the Dockerfile
Create a sample Django project
Let us create a simple, blank Django project and work on Dockerizing it.
- We will initialize the project inside a new empty folder, BlankDjango.
- Open a terminal on your Desktop, and enter the following commands:
:: This is a comment in the Windows CMD specific syntax :: Creating BlankDjango dir and changing directory of CMD mkdir BlankDjango cd BlankDjango :: Creating a venv, and storing it in BlankDjango/venv/ python -m venv venv :: Activating the venv in the terminal. The below command is specific :: to Windows cmd. Other terminals, like Powershell and Bash, have :: their own scripts to activate the venv. You will have to google it. venv\Scripts\activate.bat :: Installing Django, creating a new project and a new app python -m pip install --upgrade pip pip install django django-admin startproject MyProject . python manage.py startapp myapp :: Listing out all of the dependencies installed in our venv, and storing :: the list inside requirements.txt pip freeze > requirements.txt - For the sake of simplicity, we have to edit MyProject/settings.py: Find the ALLOWED_HOSTS variable, and set it to ['*']
Write the dockerfile
- In the BlankDjango directory, create a file named
dockerfile(no filename extension). - Copy and paste the following content inside of
dockerfile:# Using an alpine-linux base image with python installed in it FROM python:3.11-alpine # changing directory to an empty directory, /app/ (created automatically) # copying all the files from the BlankDjango (host file system) to /app/ (container file system) # note that this command will take .dockerignore into consideration COPY . . # Downloading the needed dependencies RUN pip install -r requirements.txt # Setting up the DB RUN python manage.py makemigrations RUN python manage.py migrate # Opening port 8000 in container EXPOSE 8000/tcp # command to be executed when container is running CMD ["python", "manage.py", "runserver", "0.0.0.0:8000"] - Since the venv should not be used inside the Docker container, it should be ignored when building the Docker Image. To do this, open a terminal inside the BlankDjango directory:
echo venv/ >> .dockerignore
Making the Docker Image
In order to avoid possible virtualization problems on your local machine, the Docker Image building workload will be offloaded to a free, online service: Docker Playground. Docker Playground offers short-lived VM instances that are Debian-based, and are equipped with Python, Git and Docker. Learn more about Docker playground here: https://www.docker.com/play-with-docker/
Initialize the Git repo
Still in the terminal inside the BlankDjango directory:
git init
echo venv/ >> .gitignore
git add -A
git commit -a -m "Blank Django project, with its dependencies listed in requirements.txt"
Push the Git repo to Github
Create a BlankDjango repository in your Github account, and make it public for simplicity. If this is your first time using Git on your local machine, this step may require you logging into your Github account. Still in the terminal inside the BlankDjango directory: (replace anthonyjsaab with your Github username)
git remote add origin https://github.com/anthonyjsaab/BlankDjango.git
git branch -M main
git push -u origin main
We have made great progress! From now on, we won't use any tool on your local machine except for your browser.
Building the Docker Image
- Go to https://www.docker.com/play-with-docker/ and, under "Lab Environment", click on "Get Started"
- Click on "Login" and use your DockerHub credentials to signin
- Click on "Start". Your session will last for four hours; plenty of time!
- Click on "Add New Instance". You now have a Debian-based VM!
- Pull your BlankDjango repo on GitHub using (replace anthonyjsaab with your GitHub username):
git init git pull https://github.com/anthonyjsaab/BlankDjango.git - Finally, the following command will build the Docker Image:
docker build -f dockerfile -t my_docker_image .
Congrats! You Django project is now successfully Dockerized! You can check the newly created image by entering:
docker image ls
Pushing the image to DockerHub
The image is currently stored on the Docker Lab VM, and needs to be saved to DockerHub:
#This is a Bash comment

#Login using your DockerHub credentials
docker login
#Rename your image, so that it can be pushed to your DockerHub account (replace anthonyjsaab)
docker image tag my_docker_image anthonyjsaab/my_docker_image
#Push (replace anthonyjsaab)
docker push anthonyjsaab/my_docker_image
Your Docker Image is now on DockerHub! You can see it here (replace anthonyjsaab with your DockerHub username): https://hub.docker.com/repository/docker/anthonyjsaab/my_docker_image
Run a Docker Image and test the resulting container
Finally, we want to see our Docker Image in action!
- Still in the lab, enter these commands:
#This is a Bash comment #Login using your DockerHub credentials docker login #Replace anthonyjsaab like before docker pull anthonyjsaab/my_docker_image docker run -p 80:8000 anthonyjsaab/my_docker_image - Open port 80 using the "Open Port" button
- You will be redirected to another page, and chances are you will receive a warning that the website is insecure (depending on your browser). Go ahead and ignore the warning, and make sure the URL starts with HTTP, not HTTPS
- Voila! You can now see the Django rocket launching into space :)
Conclusion
This tutorial went through all the basics steps for Dockerizing a Django project. The Django project we just Dockerized was simple. However, completing this tutorial gave you the main elements to look for when Dockerizing a real-world, full Django project.